
Pinecone Swiss Foxtail Commercial Grinder


Pinecone Swiss Foxtail Commercial Grinder
The Foxtail is for roasters, wholesalers, retailers and everyone else in need of a commercial shop grinder that is capable of grinding over 2.5 kg / 5 lbs of coffee per minute. Three-phase power, 120 mm flat discs with a range from Turkish fine to cold brew and a high-capacity hopper ensure even the highest volume demands can be met day in day out.
Equipment uptime is maximized by Foxtail's new and innovative service concept of easily replaceable pre-assembled modules for the grinding and electrical components.
Have Questions?
Email: sales@artizancoffee.com
Chat: Agents Available: M-F 9: AM to 6:00 PM EST
Call: (800) 280-2698
Text: (305) 432-4858Find a better price? Call us for the lowest price!
1-Year Warranty (Included)
Additional Protection
Add 1-Year Extended: ( *FREE with registration $100 value)
Add 2-Year Extended: $200
Add 3-Year Extended: $300
Add 4-Year Extended: $400
*Register product HERE for a FREE 1-Year Extended Warranty.
See Price at Checkout. Why don't we show the price?
PINECONE SWISS FOXTAIL COMMERCIAL GRINDER
SETTING UP THE GRINDER Place the grinder on a level and stable surface.
1.Place the grinder on a level and stable surface.
2. Install the bean hopper (2) by securing it onto the top of the grinder body with the provided screws. Ensure that enough space is available on the right side of the grinder for the bean hopper slider (4) to open completely.
3. Insert the drip tray (14) into the corresponding housing recess on the bottom of the front panel and secure it in place with the provided screws.
4. Ensure the spout pipe (10) is securely fastened in place and that the spout knocker (9) can move freely.
5. Connect the grinder power cord (12) to a suitable, secured and grounded 3-phase power supply. The grinder main power is on as soon the power cord is connected to a power supply.
6. When grinding into bags, take care to select a bag size of sufficient size to prevent the spout pipe (10) from reaching far into the coffee bag / to prevent the spout pipe from interfering with accumulating coffee inside of the bag.
Information: The grinder switches off automatically if the bean hopper is not attached.
OPERATION
Note! Risk of overheating! Exceeding the maximum permissible operating cycle can cause the grinder to overheat. Do not exceed the maximum operating cycle.
Information
The grinder applies a thermal overcurrent circuit breaker (13) that interrupts the grinder's circuit in the event of an electrical overload. To start the grinder again after the circuit breaker released, unplug the main power cord (12) from its power supply and press in the circuit breaker release button (13) on the backside of the grinder. You can now plug the main power cord (12) back into its power supply and restart grinding operation.
The grinder also applies a motor protector, which switches off the grinder when the motor becomes too hot. As soon as the motor has cooled down, the grinder can be put into operation again.
Note Risk of damage The operator has no influence on the thermal overcurrent circuit breaker. If the circuit breaker trips several times, it is essential to consult an authorized service partner as the motor may be damaged.
Filling the hopper with coffee beans
1.Remove the lid (1) from the bean hopper (2)
2.Fill the bean hopper with whole roasted coffee beans. The maximum filling level should be approximately 1 cm below the top edge of the bean hopper (2).
3.Reinstall the lid (1) onto the bean hopper (2).
4.Ensure a bag is secured onto the spout pipe (10) with the spout knocker (9) and that the bean hopper slider (4) is opened to ensure proper grinding operation.
Connecting the grinder to a 3-phase power supply
Plug in the grinder power cord (12) into a properly installed 3-phase contact socket to turn on its main power. As soon as the power supply is connected, the grinder is ready to operate
WARNING! Danger of electric shock!
Ensure a properly secured and grounded 3-phase power supply socket is available at your location and consult a certified electrician if it is not available.
Setting and changing the grind size
Turn the grind size adjustment knob (8) to the required position so that the display value on the grind size indicator display (5) points towards the desired grind size value on recipe sticker scale (3). Turning the grind size adjustment knob (5) clockwise will yield a finer grind size (position 1 indicates the finest position), whereas turning counterclockwise will yield a coarser grind size (position 8 indicates the coarsest position).
Only turn the grind size adjustment knob (8) clockwise for a finer grind size while the grinder is running to prevent damage to the grind size adjustment mechanism ▪ To avoid imbalances when adjusting grind size it is recommended to first set a coarser grind size size (about one scale value above the desired value) and only then adjust the grinding size finer to the desired value.
Changing coffee beans
1. Close the bean hopper slider (4) by pushing it into the bean hopper (2) to prevent further beans from entering the grinding chamber.
2. Operate the grinding process by pushing the ON-button (6) until the grinding chamber runs empty. Push the OFF-button (7) once the grinder is idling.
3. Remove the hopper lid (1)
4. Remove all remaining coffee beans from inside of the bean hopper (2) and temporarily transfer them to another container.
5. Clean the inside of the hopper if necessary.
6. Refill the bean hopper with new whole roasted coffee beans.
7. Reinstall the hopper lid (1).
8. Open the bean hopper slider (4).
9. Grind a few seconds to remove any residues of the previous coffee beans.
CLEANING
Risk of injury the grinder may tip over and cause injury when moved.
Always place the grinder on a stable surface that is safe from tipping over before cleaning.
Consult for help if the grinder is too heavy or bulky to move alone.
Risk of injury and danger of short circuit from water entering the grinder.
Never immerse the grinder in water or other liquids for cleaning
Never clean the grinder using a water jet or other water propulsion tools
Ensure that no water or other liquids enter the grinder body casing.
Risk of damage improper handling may cause damage to the grinder
Do not use any harsh cleaning products or sharp or metallic cleaning objects such as knives, metal scouring pads or similar. These can scratch the surface of the grinder.
Do not clean the grinder with compressed air (e.g. with a compressed air gun).
Do not put the drip tray or the lid of the bean container into the dishwasher. The parts are not suitable for dishwashers and may be damaged.
Do not lift the grinder by the bean hopper; lift only by the casing and always with both hands.
Cleaning the grinder installation surface
Remove the grinder’s power plug from its 3-phase supply socket.
Lift the grinder by its body casing using both hands and place it on a stable and clean surface.
Clean the installation surface and the underside of the grinder with a damp cloth and dry the surfaces (surfaces must be dry and free of oil and grease).
Place the grinder back on the cleaned surface and ensure steps 1-6 of chapter “setting up the grinder” are followed before resuming grinding operations.
Cleaning the grinder auxiliary components
1. Remove the grinder’s power plug from its 3-phase supply socket.
2. Use a brush to clean the following grinder components:
the spout pipe (10), the spout knocker (9), the vibrating plate (11).
3. Remove the drip tray (14) from its fixation.
4. Use a damp cloth to wipe down the casing and the drip tray as required, but at least once a week.
5. Re-attach all parts removed for cleaning and ensure steps 1-6 of chapter “setting up the grinder” are followed before resuming grinding operations
CLEANING THE BEAN HOPPER
1.Close the bean hopper slider (4) by pushing it into the bean hopper (2) to prevent further beans from entering the grinding chamber.
2. Operate the grinding process by pushing the ON-button (6) until the grinding chamber runs empty. Push the OFF-button (7) once the grinder is idling.
3. Remove the grinder’s power plug from its 3-phase supply socket.
4. Remove the hopper lid (1)
5. Remove all remaining coffee beans from inside of the bean hopper (2) and temporarily transfer them to another container.
6. Use a damp cloth to clean the inside and outside of the bean hopper and allow it to dry.
7. Refill the bean hopper with new whole roasted coffee beans.
8. Re-attach all parts removed for cleaning and ensure steps 1-6 of chapter “setting up the grinder” are followed before resuming grinding operations.
9. Grind a few seconds to remove any residues of the previous coffee beans.
MAINTENANCE
The grinding module should be serviced or replaced after grinding ca. 8-10 tons of whole roasted coffee beans. The volume until replacement depends on grind size, roast degree, bean type and condition of the module.
The grinding module includes all components that experience significant wear: grinding discs, flapper and grinding house. Changing the aforementioned separately is not recommended.
Wear gloves when changing the grinding discs to avoid injury.
Recalibrate your grind size after replacing or changing the grinding module.
Details
Commercial coffee volumes in a breeze.
Easily replaceable pre-assambled modules for the grinding and electrical components.
Over 2.5 kg/5lbs of coffee per minute.
Size adjustment knob for grind sizes, from a finer grind size to a coarser grind size.
Has a motor protector, which switches off the grinder when the motor becomes too hot.
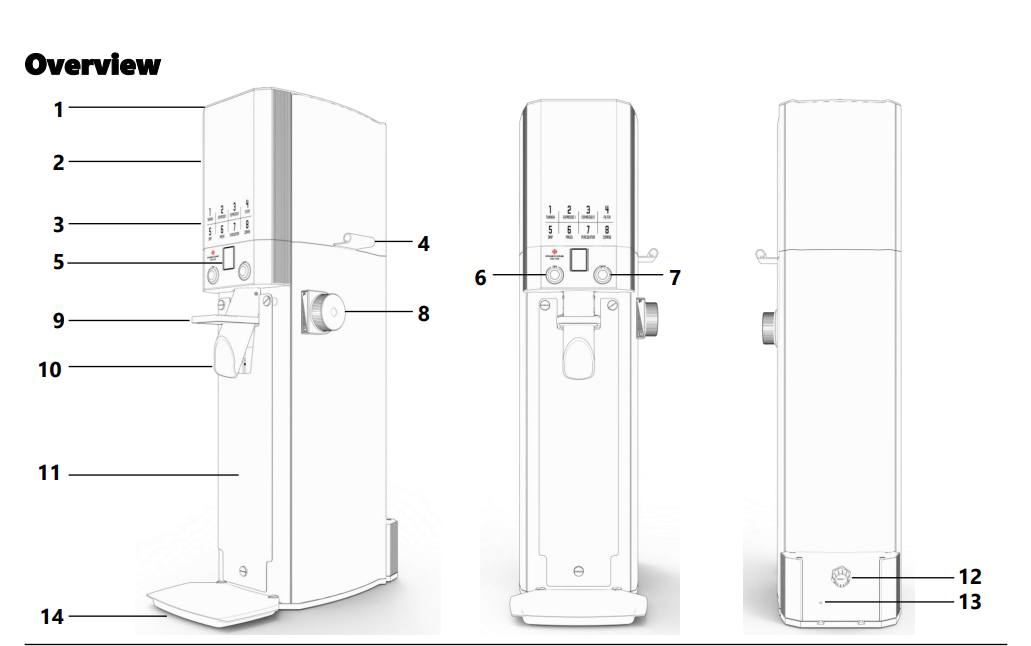
1.Bean Hopper Lid 8. Grind size Adjustment Knob
2. Bean Hopper 9. Spout Knocker
3. Recipe Sticker 10. Spout pipe
4. Bean Hopper Slider 11. Vibrating Plate
5. Grind size indicator display 12. Powder cable
6.ON-BUTTOM 13. Overcurrent Protector
7.OFF-BUTTOM 14. Drip tray
Technical Specs
Voltage // frequencies // phases:
208V // 60 Hz // 3Ph // 1,430 W // 5.7 A
380V // 50 Hz // 3Ph // 1,870 W // 3.5 A
Idle speed: 1.400 rpm
Burr diameter: 120 mm
Burr material: Steel
Average grinding capacity*: 2.400 g/sec
Bean hopper capacity: 2.500 g
Dimensions (w x h x d): 250 x 810 x 320 mm with hopper installed
Dimensions of packing (w x h x d): 275 x 690 x 505 mm (grinder)
400 x 320 x 315 mm (hopper)
Net weight: 37 kg with hopper installed
Gross weight: 49 kg
Certifications: CE, CB, CCC, ETL, KC, NSF, PSE, RCMStandard colors:
Black


